Alight Motion Keyframes and Easing Curves
Alight Motion keyframes store property values at specific timeline positions. Set at least 2 keyframes with different values, then control duration with their spacing and control acceleration with the easing curve. Values define the endpoints; spacing defines the available time; the curve redistributes speed inside that time.
This three-control model prevents the most common mistake: changing a curve when the real problem is an unchanged value or incorrect keyframe spacing.
What does an Alight Motion keyframe store?
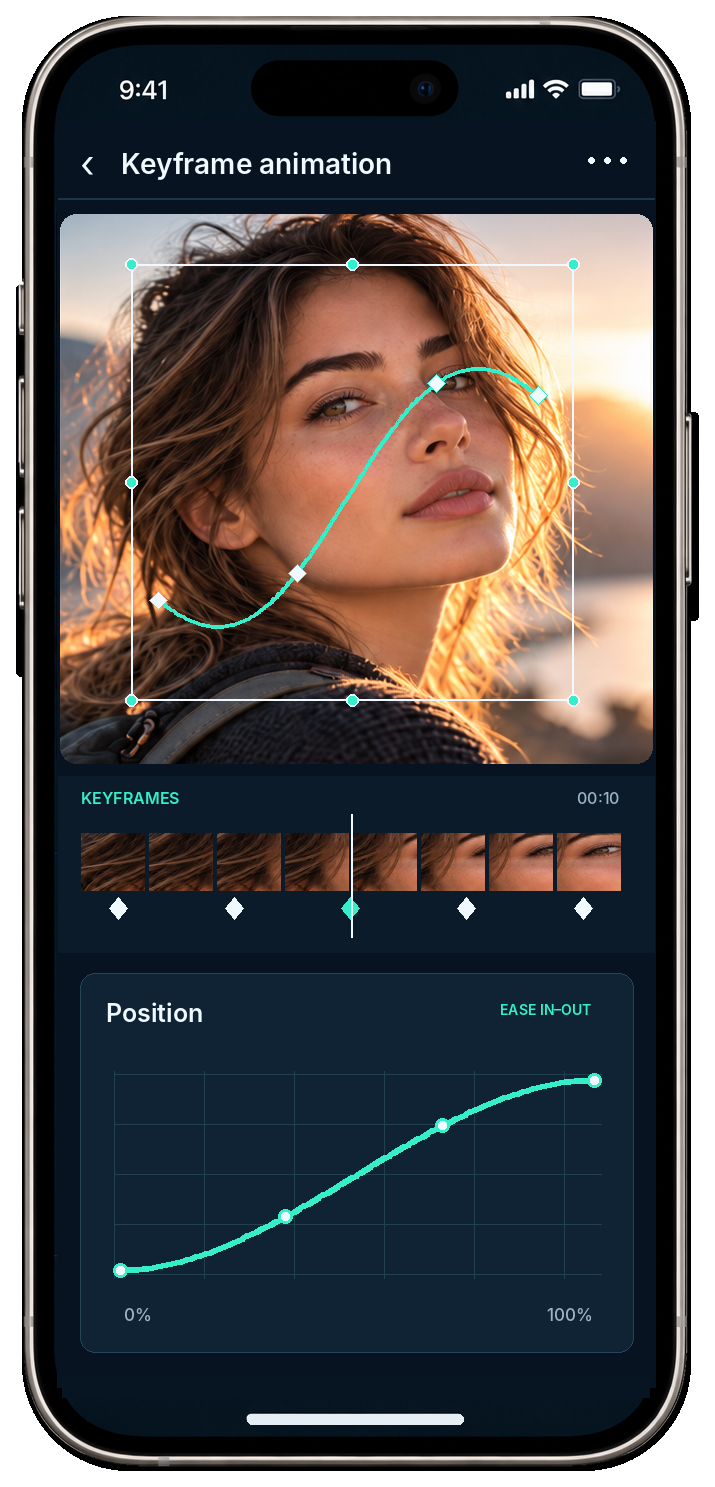
A keyframe stores one property’s value at one moment. Two keyframes let Alight Motion calculate the intermediate values—called interpolation—between a starting state and an ending state.
Position keyframes can move a title from below the canvas to the center. Scale keyframes can change an image from 80% to 100%. Rotation keyframes can change an angle. Opacity keyframes can change visibility.
Each property owns its own keyframes. A position diamond does not define scale, and an opacity diamond does not define rotation. In Alight Motion Support’s timeline example, filled white diamonds outlined in dark mark the selected property. Pale, borderless diamonds represent another property. That distinction matters when the timeline contains more than one animated property.
Which properties can use keyframes in Alight Motion?
Alight Motion supports keyframes on location, scale, rotation, color, opacity and other properties that expose the keyframe control. The selected layer and property determine which controls appear.
| Property | Stored value | Visible result |
|---|---|---|
| Position/location | X and Y placement | The layer moves across the canvas |
| Scale | Horizontal and vertical size | The layer grows, shrinks or zooms |
| Rotation | Angle | The layer turns around its pivot |
| Opacity | Visibility percentage | The layer fades in or out |
| Color | Supported color values | The layer changes color over time |
| Effect parameter | A supported effect setting | The effect strength or state changes |
No universal keyframe button exists for every control. A missing diamond can mean that the selected property does not support keyframes, not that the complete project is broken.
How do you add 2 keyframes in Alight Motion?
Create a 1-second position animation by recording one start value and one end value on the same layer property. The stable logic remains the same even when button placement changes between releases.
Select the layer and property
Select one visible image, shape or text layer. Open Move & Transform or the current equivalent, then choose Position. Confirm that the layer remains selected before touching the timeline.
Expected result: Position controls appear for the intended layer. If the controls describe another layer, stop and reselect the target.
Record the starting value
Move the playhead to 00:00, place the layer at the intended starting position and activate the Position keyframe control. Do not move the playhead until the current-property diamond is visibly active.
Expected result: a solid current-property diamond appears at 00:00. A faint diamond identifies another property and does not confirm a Position keyframe.
Record the ending value
Move the playhead to 00:01 and place the layer on the right side. Record or confirm the second Position keyframe with the current control.
Preview the complete interval
Play from before the first keyframe through the second. The layer should travel once from left to right and stop at the final value.
If nothing moves, compare the 2 Position values before changing easing. Two diamonds with identical values create no visible position change.
The Alight Motion beginner workflow explains project creation, layers and the timeline before this animation stage.
How does keyframe spacing change animation speed?
Keyframe spacing changes duration: closer keyframes complete the same value change in less time, while wider spacing gives the change more time. Spacing does not alter the start or end value by itself.
Run a controlled A/B check:
- Keep the same start and end positions.
- Preview the pair at 00:00 and 00:01.
- Move only the second keyframe to 00:02.
- Preview again without changing the curve or either position.
Spacing defines how long the motion lasts. Easing defines how speed changes during that duration.
How does the Alight Motion Curve Editor work?
The Curve Editor remaps progress between 2 keyframes without moving the keyframes or replacing their endpoint values. The curve becomes visible only when the playhead sits between the pair for the current property.
Alight Motion’s official explanation defines the graph precisely:
- The X axis represents original project time from the first keyframe to the second.
- The Y axis represents remapped animation progress across that interval.
- The curve’s slope represents speed at each instant.
- A steeper segment advances through the property change faster.
- A flatter segment advances more slowly.
Which easing curve should you choose?
Choose easing from the motion’s intended start and finish, not from a curve’s visual shape. Linear motion fits constant-rate movement; ease-in accelerates; ease-out decelerates; ease-in-out changes speed at both ends.
| Curve | Motion behavior | Useful starting case |
|---|---|---|
| Linear | Constant rate between values | Continuous mechanical movement |
| Ease-in | Starts slowly, finishes faster | An object leaving a resting position |
| Ease-out | Starts faster, slows at the end | A title entering and settling on screen |
| Ease-in-out | Starts slowly, speeds through the middle, then slows | An object moving between 2 visible positions |
“Smooth” does not mean one preset fits every animation. A clock hand needs stepped or constant behavior; a title landing on screen benefits from deceleration. Choose the physical behavior first, then shape the curve.
How do overshoot and curve copying work?
Overshoot lets the remapped animation progress extend beyond the normal curve boundary, which supports anticipation or bounce-back motion. Alight Motion Support places Enable Overshoot in the Curve Editor overflow menu.
Why are Alight Motion keyframes not working?
Keyframe failures become easier to solve when diagnosis follows the animation pipeline: selected layer → selected property → keyframe times → stored values → curve interval → platform feature.
| Symptom | Failure stage | First check |
|---|---|---|
| Diamond is faint | Property selection | Open the property that owns the keyframe; current-property diamonds have a dark border |
| Curve does not appear | Playhead/interval | Place the playhead between 2 current-property keyframes |
| Layer does not move | Stored values | Confirm the 2 position values differ |
| Wrong property changes | Property selection | Confirm Position, Scale, Rotation or Opacity before editing |
| Motion is too fast or slow | Keyframe spacing | Move the second keyframe without changing either endpoint |
| Motion looks stiff | Curve | Apply easing after timing and values are correct |
| Layer jumps past the endpoint | Overshoot/extra keyframe | Disable overshoot and inspect nearby property diamonds |
| Keyframes appear to vanish | Timeline/property view | Reselect the layer and property, then widen the visible timeline range |
| A speed keyframe control is missing | Platform/tool support | Do not assume speed/time-remap controls match ordinary transform keyframes across Android and iOS |
| Values change unpredictably | App/project state | Duplicate the project, reproduce with one layer and 2 keyframes, then preserve the original before broader repair |
Do not reinstall Alight Motion as a first repair. The app stores projects locally, and deleting or reinstalling it removes locally stored projects and elements. Preserve important work as a Project Package before any destructive repair.
How do you check a finished keyframe animation?
A finished animation passes 6 checks: correct layer, correct property, 2 intended endpoint values, intended duration, curve visible for the selected pair and stable playback through the complete interval.
To put this animation into a complete edit, follow the Alight Motion beginner workflow for project setup, media, layers, preview and export.
Frequently asked questions
What is a keyframe in Alight Motion?
A keyframe stores one property value at one timeline position. Two keyframes with different values let Alight Motion calculate the change between them. Position, scale, rotation, opacity, color, and supported effect properties can each maintain their own keyframe sequence.
How do I add a keyframe in Alight Motion?
Select the layer, open an animatable property, move the playhead to the starting time, and tap the diamond control. Move the playhead forward and change the same property’s value. Confirm that 2 solid current-property diamonds hold different values before previewing.
Why is the easing graph not showing in Alight Motion?
The easing graph requires at least 2 keyframes for the current property, with the playhead positioned between them. Filled, dark-outlined diamonds identify that property; pale diamonds without outlines belong to another property and do not define the visible curve interval.
What is the difference between keyframe spacing and easing?
Keyframe spacing controls the total time available for a value change. Easing controls how animation speed changes inside that fixed interval. Move keyframes to change duration; reshape the curve to change acceleration while preserving the pair’s endpoint values and timing.
What do the X and Y axes mean in the Curve Editor?
The Curve Editor’s X axis represents original project time between 2 keyframes. The Y axis represents remapped animation progress. The curve’s slope represents instantaneous speed: steeper sections advance faster, while flatter sections advance more slowly through the stored property change.